Python Test
This guide provides an overview of the Alooba Python test. Python is one of the most frequently evaluated skills on Alooba, and has become easily the most popular programming language for data-related roles like data scientists, data engineers and data analysts.
And of course Python is not just a language for data - it’s used to build web applications, apps, IOT applications and so much more!
Python is one of more than 500+ skills that you can assess on Alooba. You can assess Python in various ways on Alooba, including through the dedicated Python coding environment and also the Concepts & Knowledge test type.
The best way to evaluate Python on Alooba is with the Python test in the proper coding environment, as this requires candidates to actually code in Python, rather than just understanding some of the core concepts.
Alooba Python Test General FAQ
I’m not an Alooba customer yet - how can I get access to the Python test?
You can get started with Alooba by signing up directly here for immediate access.
How can I pay for the Python test?
When signing up for Alooba and using the Python test, you can use any major credit card, and enterprise users can also pay via invoice.
What type of language is Python and why is it so popular?
Python’s popularity has exploded in recent years, since its original creation in 1991 by Guido van Rossum.
Python has a lot going for it:
- Easy to Learn: Simple syntax and readability.
- Interpreted: Executes code directly, no compilation needed.
- Dynamically Typed: No need to declare variable types.
- Versatile: Used for web development, data analysis, AI, etc.
- Extensive Libraries: Rich standard library and third-party modules.
- Cross-Platform: Runs on Windows, macOS, Linux, etc.
- Community Support: Large, active community and extensive documentation.
- Object-Oriented: Supports OOP principles.
- Interactive: Interactive shell for testing and debugging.
- Integration: Easily integrates with other languages and technologies.
Can I use the Python test with other tests?
Yes absolutely, you can use the Python test with any other Alooba test too, such as the Data Analyis Test, Diagramming test, SQL test, one-way video interviews and more!
Is this an online Python test?
Yes, the Alooba test is delivered fully online, perfect for remote hiring and employees working from home. Testing online gives you the ability to scale your hiring process exponentially. No more bringing candidates into an office one-by-one, and dealing with that headache.
How do I set-up my Python test?
You can also check out this quick guide for how to set-up your Python test on Alooba. It’s really easy and takes a couple of clicks.
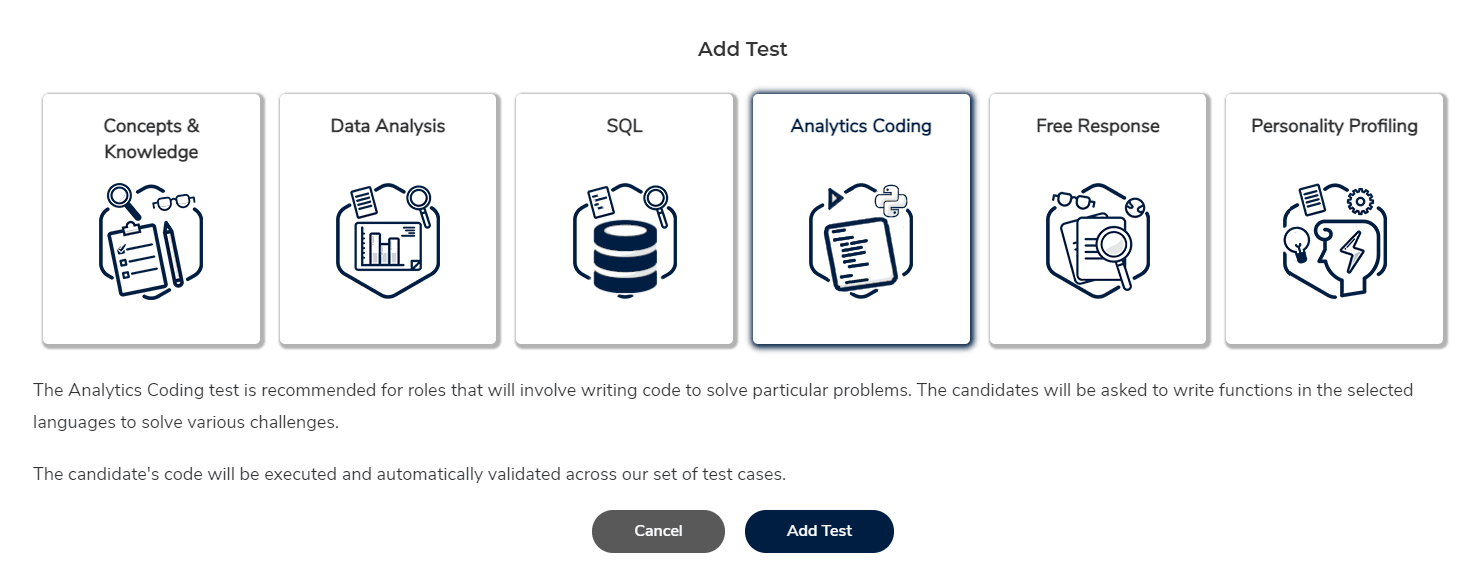
I’m trying to add the Python test in Alooba but don’t see it - where is it?
You’ll find it under the ‘Analytics Coding’ test type when creating your test.
What’s the main features of the Alooba Python test?
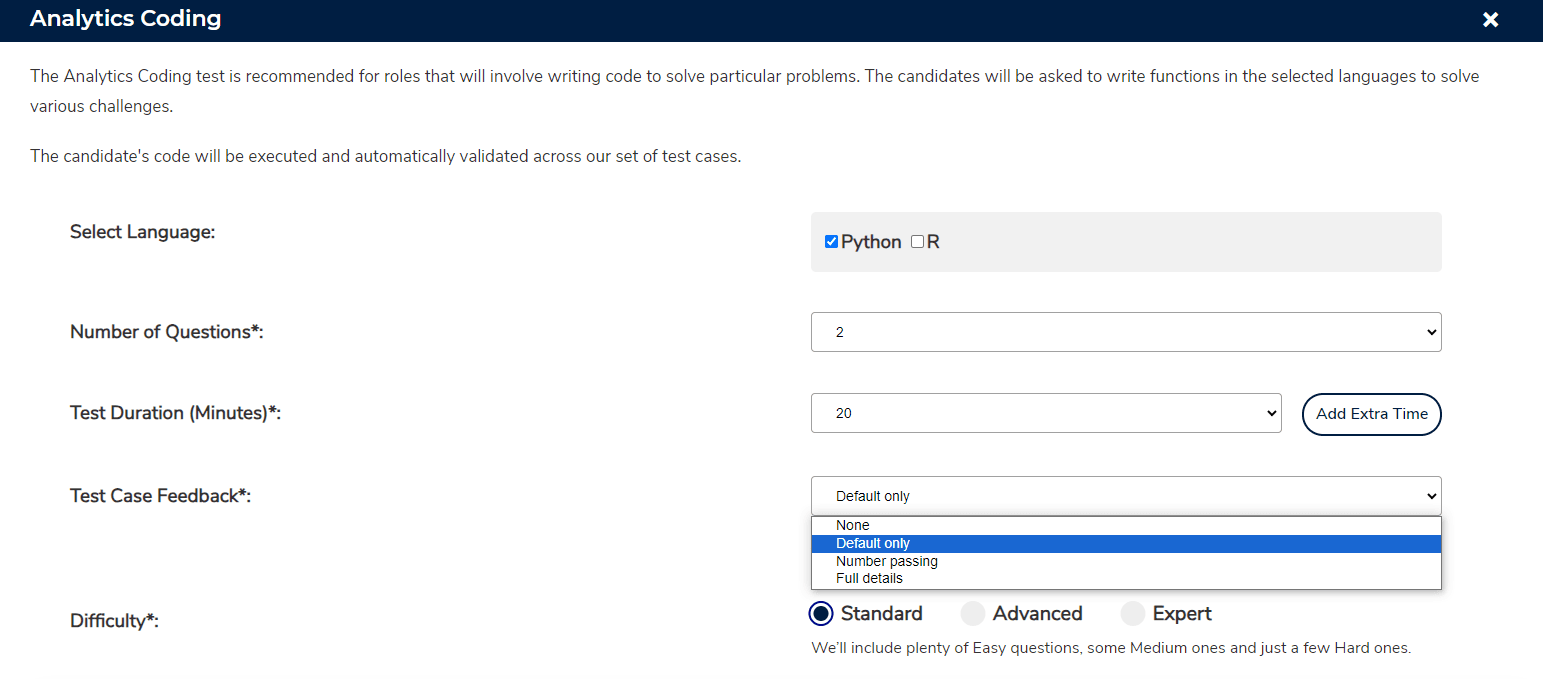
With the Alooba Python test, it comes with full customization ability (questions, timing, length, difficulty etc.), advanced cheating prevention, automated grading, a comprehensive bank of different questions, and a simple integrated development environment.
You can see all the features of Alooba products here.
Do I get to pick which questions go into the Python test?
Absolutely, you can pick whichever questions you’d like to include in your test, picking from our library of expert-written Python questions. You can also add your own custom Python questions too if you like.
I need my candidates to know either Python or R, I don’t mind which - is it possible to give candidates the choice of language?
Yes, if you are agnostic about which language the candidate is tested in, then you can leave it up to them to decide. This helps the candidate put their best foot forward and take the test in their strongest language.
We already have our own Python take-home test - why shouldn’t we stick with that?
Take home tests are often insightful, but suffer from some really common issues, including that they’re impossible to grade objectively, especially without a way to completely anonymise the candidate’s details, they slow down the hiring process, they are a pain in the neck to administer and often a tonne of work for the candidate. Here’s a more in-depth discussion of using your own manual tests vs a proper skills testing platform.
Why can’t I just ask my candidate Python questions in the interview instead?
It’s not best practice to evaluate someone’s Python skills in an interview for a few reasons.
Talking through something, using a whiteboard, using pen and paper or having someone breath down your neck as you’re trying to write Python are unenjoyable experiences for many candidates, especially introverts or those who suffer from anxiety.
Our recommendation is to evaluate Python skills in a professional test environment, which better matches how someone would write Python during their job.
If you are going to assess someone’s Python skills in an interview anyway, we’d recommend doing at least the following:
- ensuring the candidates are all asked the same questions as each other
- using a pre-defined common scoring rubric for each question
These are some basic components of running a structured interviews process, which is a great way to reduce bias and improve the accuracy of your hiring process. You can create and execute structured interviews using Alooba Interview, and learn more about how to run an ethical hiring process here.
Which kinds of roles does the Python test suit?
Any roles that require Python as a skill. These are typically technical roles, especially data scientists, data engineers, data analysts, software engineers, DevOps engineers and many more.
What topics are covered in the Alooba Python test?
The Python questions available in the Python test cover a range of topics from basic to advanced Python, with a particular focus on common challenges and tasks in data science, data engineering and data analysis.
This includes things from basic data collection (e.g. using the requests package) to simple manipulations (e.g. using pandas), through to more advanced data science modeling work. You can see the topic of each question when you set-up your assessment.
How long does the Python test take the candidate to complete?
The test time is customisable, so you can make it as long or short as you like. Typically the overall assessment time of Alooba assessments would be around 20-40 minutes when used as a screening tool, and 1-2 hours when used as a more in-depth assessment, later on in the hiring process. Note, the Python test is only one of many test types in Alooba, and your assessment might include other tests like the SQL test, data analysis test or free response test.
What is the passing score for the Python test?
Tests on Alooba don’t necessarily have a ‘passing’ score, however each test you create will have a benchmark score. When you create your Python test, the benchmark score will be calculated and shown to you. The benchmark for your Python assessment will be the predicted 90th percentile for the set of questions you included in the test. E.g. if the benchmark score is 60%, we’d expect only 10% of candidates to beat that score.
How is the test structured?
Before starting the test, candidates will have the opportunity to take the test for a practice spin. This helps ensure that they are comfortable with the coding environment and know what to expect. Once they start the actual test, it’s then a timed-test environment. The Python coding test includes the Python questions that you chose to select when setting up the test.
Will candidates receive feedback on their performance?
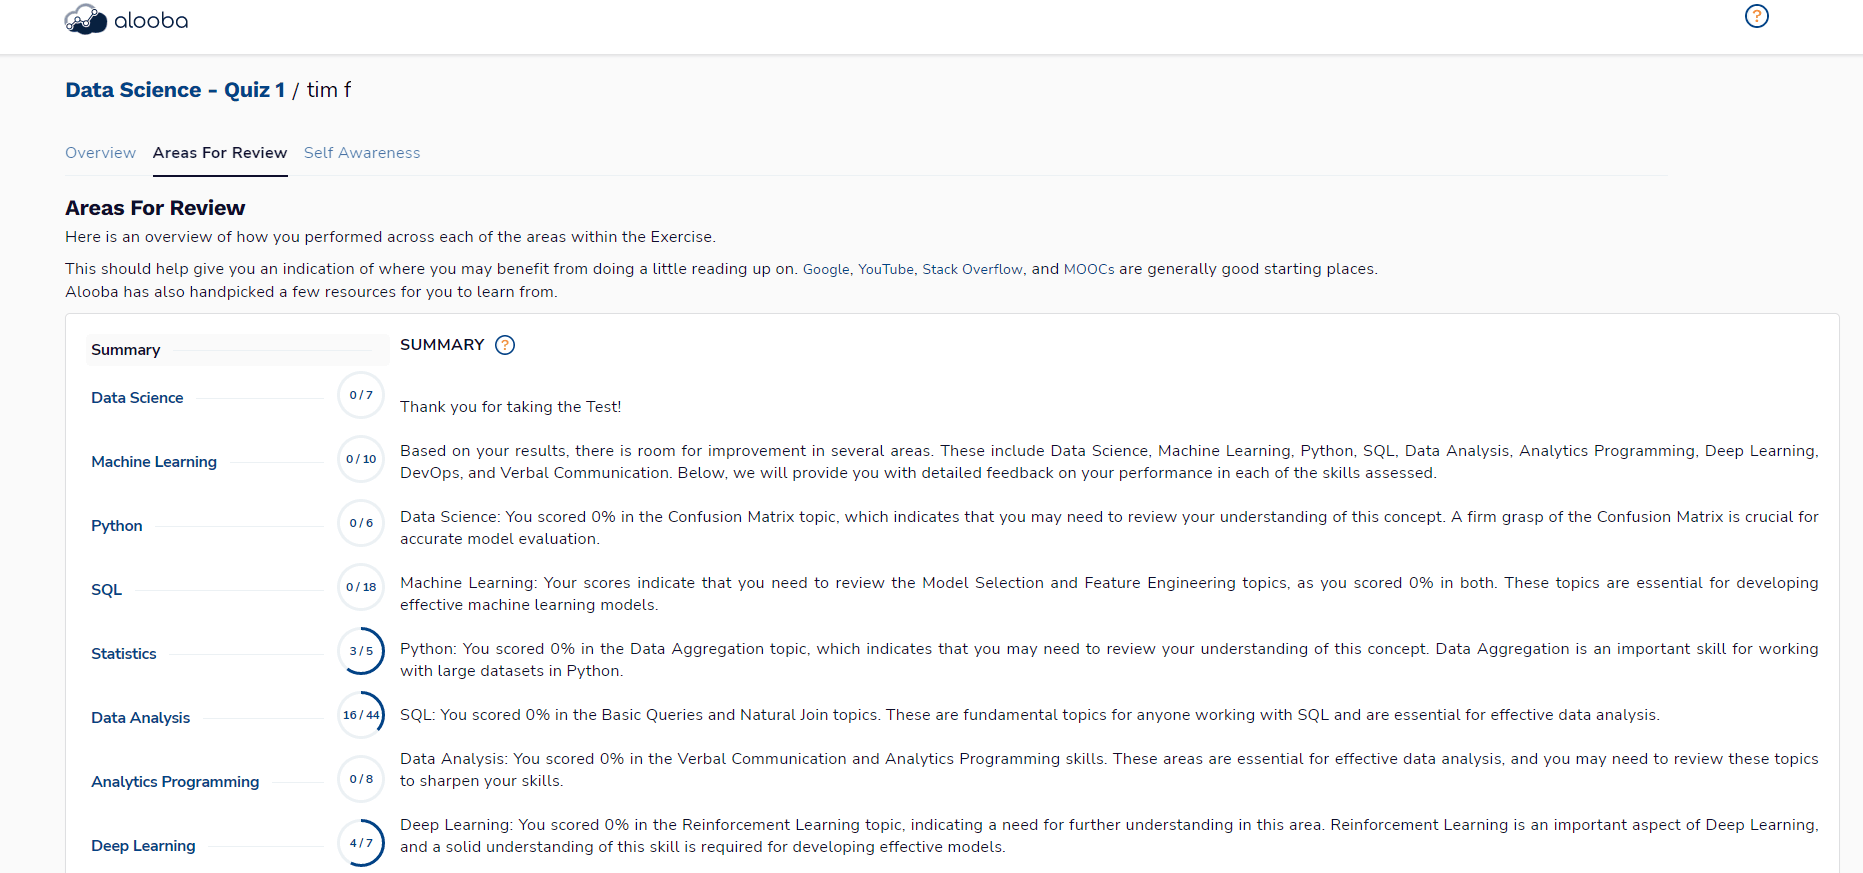
Yes, if you have configured your assessment to show candidates their results. They will then get immediate feedback on how they’ve performed, including their overall score, performance in specific areas, and suggestions for improvement. Here’s an example of that.
Is there a time limit for each question?
No, there is no specific time limit for each individual question. Candidates will have the time for the test that you have set when configuring the test. They can then spend this time on whichever questions they like.
How can candidates prepare for the Python test?
Candidates can prepare for the test by reviewing key Python concepts, practicing coding problems, and using resources such as online tutorials, coding platforms, and textbooks. They can also take the free Alooba Python test to get comfortable with the coding environment, and prior to completing the actual Python test, there’s a practice test available to play around in.
Which Python packages are installed on the Alooba Python server?
There are a variety of popular Python packages installed in the Alooba Python environment, including mlxtend, NumPy, pandas, scikit-learn, pytest, SciPy, PySpark and Requests.
If you’d like to install a new one, no worries - please let your account manager know and we can add it.
Where does the candidate’s Python code run?
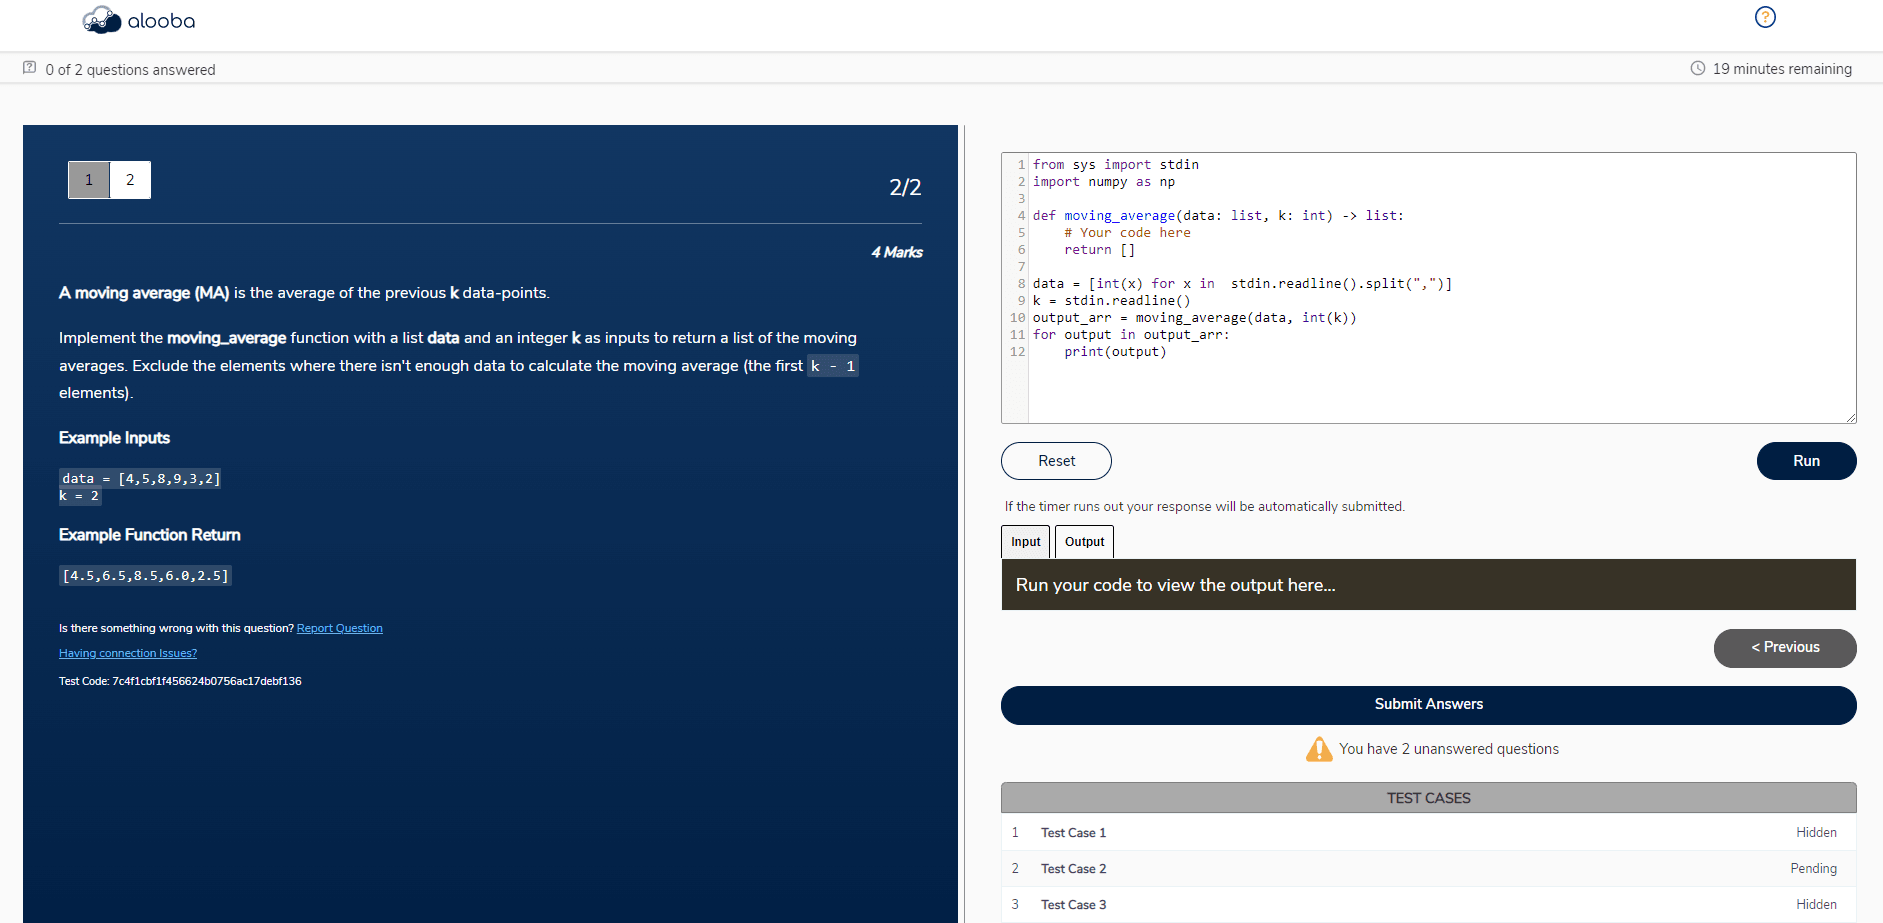
The candidate enters ‘execute’ during the test on their browser, and then this Python code is executed on our server, in a containerised environment. You can see the environment below.
Does the candidate need to install anything to complete the Python test?
Absolutely not - they just complete the test in their browser of choice, like all the other Alooba tests.
How does the grading work?
The grading for the Python test works based on test cases. The candidate’s Python code is run against various test cases (input datasets). The candidate then receives points for each test case that passes. A test case passes simply if the output produced using the candidate’s code matches what the expected output was of the correct code/answer key.
Suppose there is a difficult Python question worth 8 points, this might have 4 associated test cases with it. The candidate would receive 2 points for each test case that successfully passes.
This grading style is essential to accurately measuring the skills of the candidate, and ensuring that a candidate who makes a minor mistake receives partial credit, rather than just 0 points.
What kind of feedback does the candidate get during the Python test?
During the assessment, as the candidate executes their Python script, they will get some level of feedback on whether or not their code is passing the test cases. You can choose this when setting up the assessment. You can see there are various options, including no feedback at all, through to full details of which test cases, their names are whether or not they are failing. This transparency gives the candidate feedback and an opportunity to fix any mistakes that they have made.

What does the Python environment look like for the candidate?
The candidate codes in a clean and simple environment, as shown below.

What do the candidate’s results look like for us? Do we see their code?
Yes absolutely, you get to see the candidate’s code, including seeing exactly how they arrived at their answer, how long they took, which test cases did/did not pass and why etc.
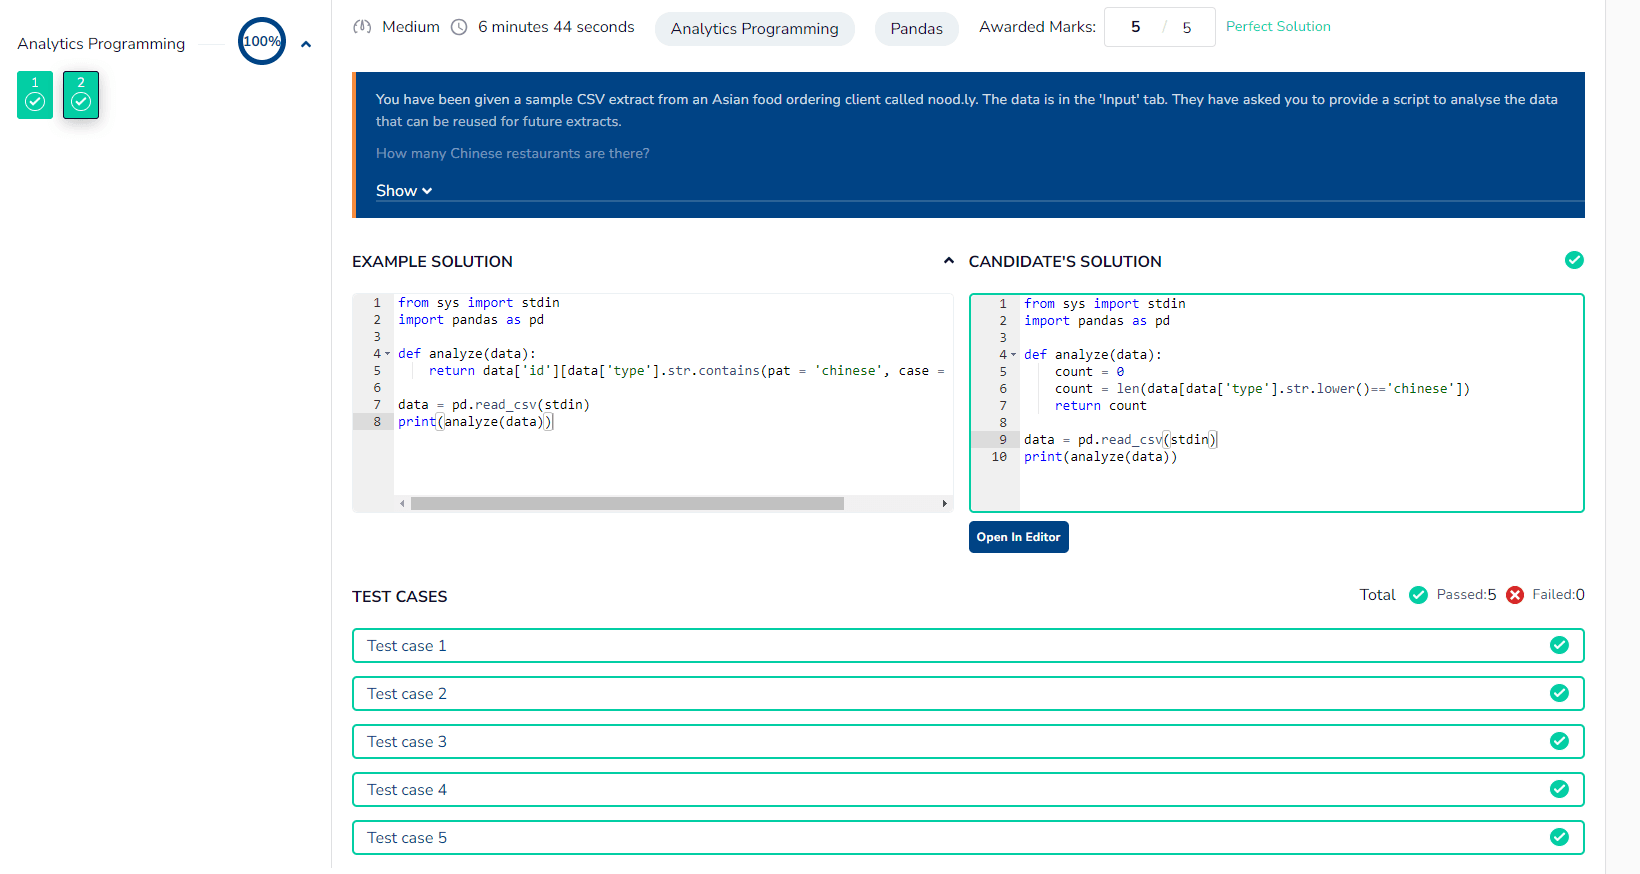
Does the Python test come with cheating protection?
Yes the Python test comes with Alooba’s advanced cheating protection, which includes AI text detection. Check out our complete guide to prevent candidates cheating.
Is Python the only language available in the coding test?
No, you can also evaluate your candidates in R.
You can also test candidates in SQL, under the SQL test.
Looking to evaluate a different language? Reach out to us here as we can easily add C#, C++, Java or any other language.
Can we see an example of the Python test?
Can we see an example of the Python test?
Sure, there’s a free Python test available on Alooba which you can click through and take. Note, this is from a candidate’s perspective. The view as a customer will be different and you’ll get more detailed insights into the strengths and weaknesses of the candidate.
Here’s a free practice Python test.
Can the candidate practice the Python before taking the real test?
Yes, prior to starting the Python test, the candidate has the opportunity to enter the Python test environment and practice with some warm-up questions.
What are the benefits of using the Alooba Python test?
The Alooba Python test is an easy way to evaluate your candidates’ Python skills, ensuring they have the right skills for your role. No need to create your own test, administer your own test or grade your own test.
Can I add my own Python questions?
Yes, you can add your own Python questions through the Alooba question bank.
Is Python the same as NumPy or Pandas?
No, NumPy and Pandas are two popular ‘packages’ for the language Python. Basically, that means that they are add-ons to the base Python language. These are two of the packages installed in our Python environment, so if you’re looking to evaluate your candidates’ NumPy and Pandas skills, then you can do that with the Alooba Python test.
What’s an example of some Python code?
This example demonstrates how to perform data operations in base Python. It showcases the use of lists, dictionaries, list comprehensions, and basic functions for filtering and aggregation.
Here’s a great example of where using base Python is not going to be very efficient or easy - you can much more easily achieve the below using the pandas package in Python.
# Creating a list of dictionaries to represent the data
data = [
    {'Name': 'Alice', 'Age': 24, 'City': 'New York', 'Salary': 50000},
    {'Name': 'Bob', 'Age': 27, 'City': 'Los Angeles', 'Salary': 60000},
    {'Name': 'Charlie', 'Age': 22, 'City': 'Chicago', 'Salary': 55000},
    {'Name': 'David', 'Age': 32, 'City': 'Houston', 'Salary': 65000}
]


# Function to filter rows where Age is greater than 25
def filter_data(data):
    return [person for person in data if person['Age'] > 25]


# Function to calculate average salary by city
def average_salary_by_city(data):
    city_salary = {}
    for person in data:
        city = person['City']
        if city in city_salary:
            city_salary[city].append(person['Salary'])
        else:
            city_salary[city] = [person['Salary']]

    # Calculate the average salary for each city
    average_salary = {city: sum(salaries) / len(salaries) for city, salaries in city_salary.items()}
    return average_salary


# Printing the original data
print("Original Data:")
for person in data:
    print(person)


# Filtering the data
filtered_data = filter_data(data)


# Printing the filtered data
print("\nFiltered Data (Age > 25):")
for person in filtered_data:
    print(person)


# Calculating the average salary by city
avg_salary = average_salary_by_city(data)


# Printing the average salary by city
print("\nAverage Salary by City:")
for city, salary in avg_salary.items():
    print(f"{city}: {salary}")
What’s an example of some NumPy code?
This NumPy code demonstrates how to create and manipulate arrays and matrices, as well as perform basic mathematical operations on them.
import numpy as np


# Create a 2x3 matrix filled with zeros
matrix = np.zeros((2, 3))


# Create an array with values ranging from 0 to 5
array = np.arange(6)


# Reshape the array into a 2x3 matrix
reshaped_array = array.reshape((2, 3))


# Perform element-wise addition of the two matrices
result = matrix + reshaped_array


print("Matrix filled with zeros:\n", matrix)
print("Original array:\n", array)
print("Reshaped array:\n", reshaped_array)
print("Result of addition:\n", result)
What’s an example of some pandas code?
This example demonstrates how to create a DataFrame from a dictionary, add new columns, filter rows based on conditions, and perform group-by operations to aggregate data in Pandas.
import pandas as pd


# Creating a DataFrame from a dictionary
data = {
    'Name': ['Alice', 'Bob', 'Charlie', 'David'],
    'Age': [24, 27, 22, 32],
    'City': ['New York', 'Los Angeles', 'Chicago', 'Houston']
}
df = pd.DataFrame(data)


# Adding a new column 'Salary'
df['Salary'] = [50000, 60000, 55000, 65000]


# Filtering rows where Age is greater than 25
filtered_df = df[df['Age'] > 25]


# Grouping by 'City' and calculating the average 'Salary'
grouped_df = df.groupby('City')['Salary'].mean()


# Printing the results
print("Original DataFrame:\n", df)
print("\nFiltered DataFrame (Age > 25):\n", filtered_df)
print("\nAverage Salary by City:\n", grouped_df)


